Ready to take control of your farm's destiny? Building your own tractor may sound daunting, but it offers unmatched customization and potential cost savings. This comprehensive guide will walk you through the process, from assessing your needs to maintaining your finished machine. Imagine the satisfaction of operating a tractor perfectly tailored to your farm! For more detailed instructions, check out this helpful tractor building guide.
1. Planning Your Perfect Tractor: Assessing Your Needs
Before you even think about tools, let's get practical. What tasks will your tractor perform? Tilling acres? Maintaining a small garden? Property size dictates the tractor's size and power. A compact machine suits a small garden, while a larger, more powerful model is necessary for extensive farming.
Consider your tractor's workload: plowing, mowing, hauling, operating attachments. This determines the necessary horsepower and attachments. Budget realistically; building a tractor isn't cheap. Consider initial costs and potential unforeseen expenses. What are your cost-saving goals? How much time can you realistically dedicate to building and maintaining the tractor? These questions are critical during the initial assessment.
2. Choosing Your Tractor's Core Components
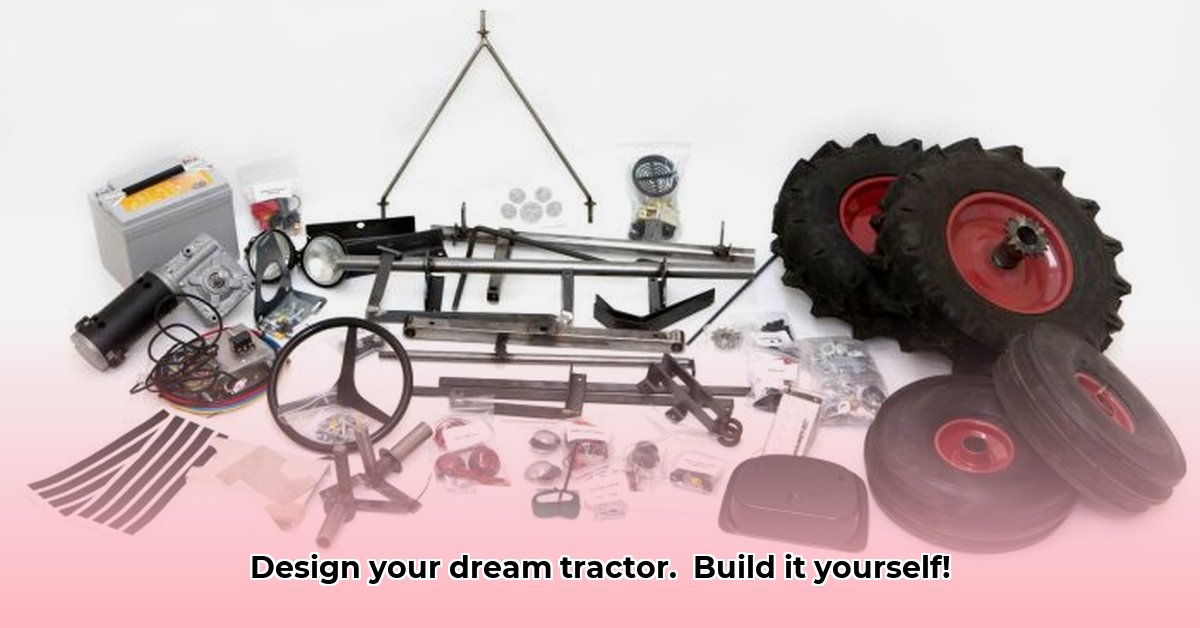
Currently, ready-made tractor kits are uncommon. You'll likely source components individually. This offers greater customization but demands more research.
Let's start with the engine – the tractor's powerhouse. Horsepower directly impacts capability. More horsepower means tackling tougher jobs, but also increased fuel consumption and cost. Fuel efficiency is critical, especially with extensive use. Research engine manufacturers' reputations and reliability; some brands are known for longevity and easy maintenance. How important is ease of maintenance to you? Does a higher initial investment in a more reliable engine outweigh the long-term costs of frequent repairs?
Next, the transmission – the "gears" – is vital. Hydrostatic transmissions offer smooth, variable speed control, perfect for precise maneuvers. Manual transmissions are rugged and cheaper but less user-friendly. Consider the type of terrain and the specific tasks you need the tractor to perform. Will the added precision of a hydrostatic transmission justify the extra cost? What about the terrain you will most commonly work on – is a manual transmission sufficient?
You'll also need a sturdy frame or chassis, a dependable hydraulic system, and appropriate wheels and tires suited to your terrain. Consider heavy-duty steel for the frame and tires that grip well in muddy or rocky conditions. How will you be transporting the tractor? How will this impact your choice in chassis design?
3. Supercharging Your Tractor: Customizing with Attachments
This is where your tractor truly transforms. Attachments like plows (for spring planting), mowers (for summer upkeep), loaders (for material handling), and backhoes (for digging) expand functionality. Remember compatibility; not all attachments work with every tractor. How many different attachments will you require? Will you need to swap them frequently, impacting the ease of detachment and attachment?
Safety is paramount. Always follow manufacturer instructions. Improperly attached equipment can lead to malfunctions or accidents. If unsure, consult a qualified mechanic. What are the potential consequences of unsafe attachment practices? How well-versed are you with the necessary safety precautions?
4. Assembly: A Step-by-Step Guide
This phase demands patience and attention to detail. Gather components, check for damage or missing parts, and review assembly manuals. A helper can be invaluable.
Step 1: Foundation First: Assemble the tractor's frame, ensuring all bolts are tight.
Step 2: Power Up: Install the engine and transmission, ensuring secure mounting and proper alignment. This often requires precision and specialized tools.
Step 3: Hydraulics – The Life Blood: Install and connect the hydraulic system; double-check connections and fluid levels.
Step 4: Testing the Hydraulics: Test for leaks and address any issues immediately.
Step 5: Wheels, Tires, and More: Install remaining essential parts.
Step 6: Adding Attachments: Add attachments, ensuring proper installation.
Prioritize safety! Wear protective gear, use the correct tools, and take breaks. What are the potential risks of rushing through the assembly process, and how can these be mitigated?
5. Fine-Tuning Your Machine: Testing and Calibration
Thoroughly test your tractor. Start with smaller tasks, gradually increasing the workload. Observe engine responses and monitor unusual noises or vibrations. Calibration (adjusting settings and making modifications) may be necessary to optimize performance. What are the potential sources of error that could require adjustment during the calibration phase?
6. Maintenance and Repair: Keeping Your Tractor Running
Regular maintenance extends your tractor's life and minimizes costly repairs. This includes regular inspections, fluid changes, and care of moving parts. Keep a maintenance log. Addressing minor issues immediately prevents larger problems later. Investing in the right tools and resources aids maintenance and troubleshooting. What are the potential long-term cost savings associated with preventative maintenance?
Building your own tractor is a significant undertaking, but the reward of a custom-built machine perfectly suited to your needs is unparalleled. Are you ready to embark on this fulfilling journey?
How to Compare Customized Tractor Package Pricing From Different Manufacturers
Building your own tractor offers significant customization and potential cost savings, but requires careful planning. This section focuses on price comparison and cost-effectiveness.
Step 1: Defining Your Farming Needs
Define your agricultural needs: land size, crops/tasks, budget, and desired features. This assessment guides your choices. A clear understanding of your needs is paramount to making sound financial decisions. Understanding the long-term costs of your decisions is critical to minimizing overall expense.
Step 2: Exploring Base Kit Options (or Sourcing Components)
Ready-made kits are uncommon. Sourcing individual components offers customization but demands more research. Compare prices and reliability across different suppliers. Consider factors like engine horsepower, transmission type, chassis durability, and hydraulic system capacity when comparing prices from different manufacturers.
Step 3: Choosing and Integrating Attachments
Consider various types of attachments, ensuring compatibility with your tractor. Research the cost of different attachments and their compatibility with your selected tractor components. Prioritizing attachments relevant to your primary farm activities can lead to more cost-effective outcomes.
Step 4: Assembly, Safety, and Testing
Meticulous assembly and thorough testing are crucial. Proper planning and attention to detail here can prevent costly mistakes down the line.
Step 5: Ongoing Maintenance and Troubleshooting
Regular maintenance is essential for long-term cost savings. Plan for maintenance costs to account for the life cycle expenses of your custom-built tractor.
This guide provides a framework for building your own tractor. Remember to prioritize safety and thorough planning throughout the process. The result will be a machine perfectly tailored to your specific needs and budget.